UPDATE: With respect to terminology, check out Drew Neil’s comment below.
In Vim, I’ve been using splits for years. Splits are great:
- view 2 files at the same time
- view 2 parts of the same file at the same time
- dump bits of text into a new split
- dump command outputs into a new split
- and so on…
However, I’ve been using the subset of splits that I understood while shying away from advanced use cases. Somewhere down my TODO list, there was an item called “understand Vim splits”. This blog post is an attempt to document what I discovered.
3 Questions
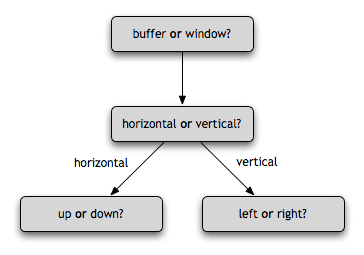
When it comes to splitting, there are, thankfully, only 3 questions:
- are you splitting the buffer or the window?
- are you splitting horizontal or vertical?
- do you want to send the split left, right, up or down?
When you type:
:split
You are using the defaults: buffer, horizontal, up.
There are 8 combinations:
window  horizontal  up      -->   :topleft    split
window  horizontal  down    -->   :botright   split
window  vertical    left    -->   :topleft    vsplit
window  vertical    right   -->   :botright   vsplit
buffer  horizontal  up      -->   :leftabove  split
buffer  horizontal  down    -->   :rightbelow split
buffer  vertical    left    -->   :leftabove  vsplit
buffer  vertical    right   -->   :rightbelow vsplit
What were they thinking?! Good time to give up? :-D
Illustrated
Look at the following picture. Starting from a initial state, follow what happens when you invoke these commands. (click to enlarge)

- for this example, it doesn’t matter whether you’re using split/vsplit or new/vnew
- the blue buffer is where your cursor is
- the buffers are numbered to help locate them before and after
Even though I spent a few hours thinking about splits and studying the commands to eventually come up with that summary graph, I can’t say it’s the most intuitive set of commands around. If I stop everything I’m doing, I can mentally come up with the right command but it’s very taxing.
Here’s a list of mappings I just added to my .vimrc
" window
nmap <leader>sw<left> :topleft vnew<CR>
nmap <leader>sw<right> :botright vnew<CR>
nmap <leader>sw<up> :topleft new<CR>
nmap <leader>sw<down> :botright new<CR>
" buffer
nmap <leader>s<left> :leftabove vnew<CR>
nmap <leader>s<right> :rightbelow vnew<CR>
nmap <leader>s<up> :leftabove new<CR>
nmap <leader>s<down> :rightbelow new<CR>
Feel free to replace the arrow keys (up, down, left, right) with k, j, h, l if you’re more comfortable with those bindings.

I think a good remember of the difference between buffer and window will be good too. I used them, but never really take the time to look and understand the difference!
Anyway, good article!
Thanks
Carl
This is a well thought out article, and your diagrams really help to
clarify what you’re saying. Well done.
When you speak of splitting a ‘window’, I think you are referring to the
entire frame that contains Vim. In the case of GVim, this would be a
graphical window provided by the OS, and for regular Vim it would be the
window containing the Terminal. When you speak of splitting a ‘buffer’,
I think you are referring to what Vim calls a ‘window’.
It’s unfortunate that Vim uses the word ‘window’ to define something
different from the windows provided by the operating system (OS). In the
Vim documentation,
a ‘window’ is defined as ‘a viewport on a buffer’, while a buffer is an
‘in-memory representation of a file’. According to this definition, it
doesn’t really make sense to *split a buffer*, seeing as a buffer may
not be visible in any of Vim’s windows.
If you were to talk of splitting a ‘window’ instead of a ‘buffer’, and
splitting a ‘frame’ instead of a ‘window’ it would be more consistent
with the terminology used by Vim.
Ah yes … you’ve got me here.
I did start my research by reading the definition of frame, buffer, window, etc … but as I was thinking of mnemonics and keybindings, I might have confused things. There’s a difference between what’s easy to remember and what Vim decided to call it…
I’ll point an update to your comment.
> There’s a difference between what’s easy to remember and what Vim decided to call it…
Indeed. I’m not even sure if ‘frame’ is the best choice of word to stand for a window from the OS, as opposed to Vim. Perhaps Vim’s “windows” should have been called “panels” instead. Anyway, the baggage of Vim’s terminology is older than certain operating systems, so we can hardly blame it.
After reading this article, I went back and looked more closely at the Vim documentation on windows, at it made so much more sense:
A buffer is the in-memory text of a file.
A window is a viewport on a buffer.
A tab page is a collection of windows.
In response to yours and Drew’s discussion on what to call the whole thingamajig (i.e., a “window” from the GUI OS perspective), I think in the Vim world this is called a “screen”.
e.g. (from “:help windows.txt”):
CTRL-W K
Move the current window to be at the very top, using the full width of the screen. This works like closing the current window and then creating another one with “:topleft split”, except that the current window contents is used for the new window.
This terminology is throughout the Vim documentation.
I agree with @Drew. I think it would be better to update the article in order not to confuse people with customised terminology.
Great article – could you also write about folds.
It is a pain configuring folds – especially for ruby and python.
thanks!
I’m using only
:split file_to_edit (splits above)
:vsplit file_to_edit (splits right)
thats all I need.
Very well demonstrated. I’ve been using this as long as I can remember but never really thought about the frame vs. window. Thanks.
You can also open new windows using commands starting with CTRL-W:
CTRL-w s split horizontally
CTRL-w v split vertically
CTRL-w c close current window
CTRL-w o make current window the only window
Check the help files for more:
:help opening-window
More often than not, I re-arrange mine. If you’re viewing two opposing windows which are split vertically (top left arrangement in figure above), and you wish to view them horizontally (bottom left arrangement) then you can simply “push” the window by using CTRL_w-J (case sensitive). This action makes the current window the “bottom” most buffer. Respectively, CTRL_w-K performs the respective action of making the current buffer the top-most buffer. H and L push the buffer left and right respectively, turning a horizontal two-buffer arrangement into a vertical one.
This is great for two buffers. I find more often than not, I have more than two buffers. I tend to stack them into two columns so I can view two things at once. Unfortunately, CTRL_w-L and H create new columns all together. So I use the following routine to move a buffer from the current column to the next directional column:
function! MoveBuf(direction)
    let bufno = bufnr("%")
    hide
    exec "wincmd " . a:direction
    new
    exec "buffer " . bufno
endfunction
I’ve mapped it to CTRL_w-META_h, META_l, META_j, and META_k respectively (so CTRL_W, SHIFT_L makes this the right most buffer, but CTRL_W, ALT_L moves this buffer right one column).
map  :call MoveBuf("h")
map  :call MoveBuf("l")
map  :call MoveBuf("j")
map  :call MoveBuf("k")
Since having done this I use it daily, hopefully you will find it useful as well.
It would be nice if wordpress would let you preview comments. I managed to forget to escape the mapping commands.
map <C-W><M-h> :call MoveBuf("h")<CR> map <C-W><M-l> :call MoveBuf("l")<CR> map <C-W><M-j> :call MoveBuf("j")<CR> map <C-W><M-k> :call MoveBuf("k")<CR>Como deixar o editor VIM colorido (Highlighting)…
I found your entry interesting thus I’ve added a Trackback to it on my weblog :)…
[…] Vim Splits: A Guide to Doing Exactly What You Want « Jonathan’s Techno-tales – […]
What a great article! Thank you for taking the time not only to explore this issue, but to share it with the community in such a detailed yet clear way. Before reading this, while I made heavy use of splits, I never really understood what was going on, and I did not understand why the splits I opened would open up the places and sizes that they do. This cleared it all up. That diagram is spectacular. An ASCII version should be incorporated into the Vim help/manual!
[…] was looking for a way to get better control over my buffers in vim. Theres a fantastic blog post that explains how splits and windows work. Since I dont use the number pad, I’ve bound a heap […]
[…] Vim Splits […]
The long intro of what the story ISN’T about kind of turned me off. And you did&7#821n;t really give much of a summary for what’s different about your story. The dad likes plants and they move around a lot. So, what’s changed? I’d be kind of interested in reading more if I knew it was going to be something with a good twist and character development.
Good Article. It helped me a lot
[…] Luego de las pestañas podemos aprender a dividir la ventana actual en múltiples partes de forma vertical u horizontal, esto puede resultar de utilidad si contamos con espacio suficiente y queremos inspeccionar múltiples archivos o el mismo archivo en diferentes puntos. Por acá les dejo un enlace a un artículo muy bueno que trata de ello. [Vim Splits: A Guide to Doing Exactly What You Want](https://technotales.wordpress.com/2010/04/29/vim-splits-a-guide-to-doing-exactly-what-you-want/) […]
[…] UPDATE: With respect to terminology, check out Drew Neil’s comment below. In Vim, I’ve been using splits for years. Splits are great: view 2 files at the same time view 2 parts of the s… Read more […]
[…] Vim Splits: A Guide to Doing What You Want (2010) 6 by polm23 | 0 comments on Hacker News. […]
[…] Vim Splits: A Guide to Doing What You Want (2010) 6 by polm23 | 0 comments on Hacker News. […]
[…] Vim Splits: A Guide to Doing What You Want (2010) 6 by polm23 | 0 comments on Hacker News. […]
[…] Vim Splits: A Guide to Doing What You Want (2010) 6 by polm23 | 0 comments on Hacker News. […]
[…] Vim Splits: A Guide to Doing What You Want (2010) 6 by polm23 | 0 comments on Hacker News. […]
[…] Vim Splits: A Guide to Doing What You Want (2010) 6 by polm23 | 0 comments on Hacker News. […]
[…] Vim Splits: A Guide to Doing What You Want (2010) 6 by polm23 | 0 comments on Hacker News. […]
Reblogged this on Memory Log.
[…] Source: Vim Splits: A Guide to Doing Exactly What You Want | Jonathan’s Techno-tales […]
[…] Vim Splits and Vim tmux Navigator, two approaches to the same idea. (via) […]
[…] 관심이 있다면 분할에 대한 추가 정보가 있습니다. 링크 […]
[…] Here’s some additional info on splits, if you’re interested. Link […]